Query Builder Security
The Query Builder contains security functionality which may block some data from displaying on select reports.
I. Pre-requisites - in order to use the Query Builder's security featuers:
- The system option Querybuilder.UsesSecurity must be set to True. Please contact your DDC Support Rep to enable this feature.
II. Account Security - accounts may be blocked from displaying on select reports, even if they fit the query criteria.
A. Assign accounts to a security group
-
Accounts can be assigned to a security group on the Demographics > Account page, under the Security Groups. Select one or more letters to assign the account to a group. In the example below, the account belongs to security group B & F.

-
If an account does not belong to any security groups, it will always print on the reports where it fits the query criteria.
B. Designate account security groups per report
-
This is applicable only on reports that utilize the Account #. Reports that do not have an account # will not display the Account Security Group as shown below.
-
The Query Builder Admin can set up which security groups a report can use. A Query Builder Admin needs to have the security permissions set for QueryBuilder.AdminSecurityGroups. Contact your DDC Support Rep to set up the Admin permissions.
-
The Admin must set up each report that should use the security groups. Reports that are not set to use the security groups will print all accounts that fit the criteria, regardless of the account security group they are in.
-
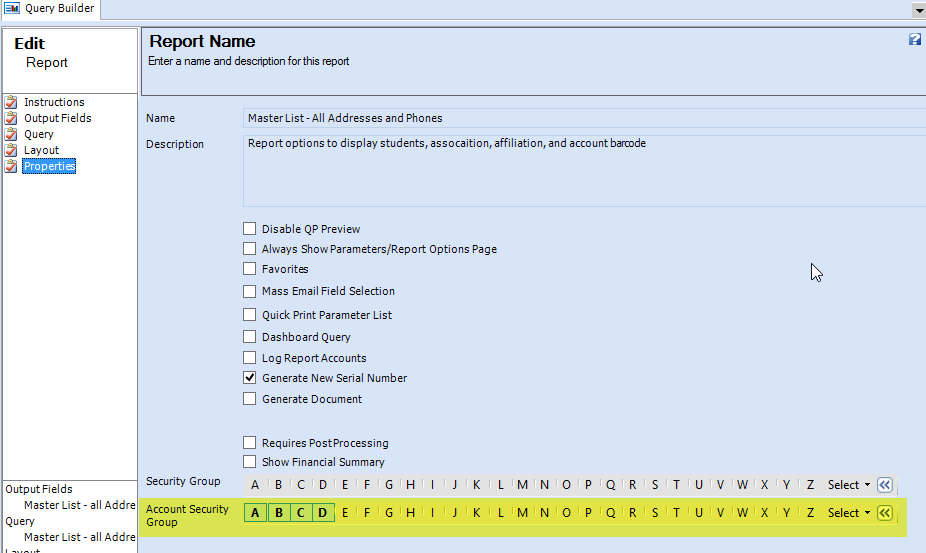
In the Query Builder, select the report and select Edit. Go to the Properties page.
-

-
In the Account Security Group section, select each account security category that may be selected to print on the report. In the example above, the report Master List - All Addresses and Phones is being set to enable the account security groups of A, B, C, D.
-
If an account does not belong to any account security group, it will always print on the report.
-
If an account belongs to an account security group of E - Z, it will never print on this report, unless it also belongs to a group in A - D.
-
If an account belongs to a security group of A, B, C, or D, the user will be able to select which of the groups will or will not print on the report.
-
Click Save
C. Select the account security groups to print on the report
-
The user can select the groups to be included in the report. Run the report by clicking Preview. See Running a Report.
-
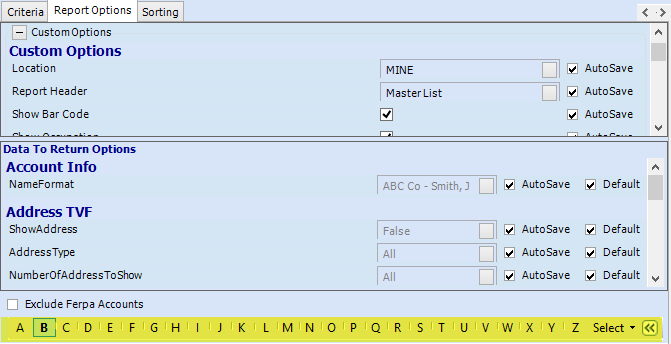
On the Report Options page, the account security groups will display. Select the groups to be included. In the example below, all accounts that fit the query criteria and are in account security group of B, or are not in any account security group, will print.
-

-
The option Exclude Ferpa Accounts will exclude all accounts that belong to the account security group of F. This is built into the design of the Query Builder security functionality. Ferpa refers to student privacy regulations.
-
Users may be blocked from accessing specific groups via the security setting of Record.Accounts.
II. Data Security - users may be blocked from viewing specific data on reports they do not have permission to access. The following data may be set up to be blocked on reports:
A. Financials - users may be restricted from accessing data belonging to select financial categories.
-
Financial data may be restricted if the financial categories were set up into security groups. See Financial Categories.
-
The system administrator must set up each user's security access for the Record.Financials.Category option.
-
When running reports that display financial data, if the user does not have the permissions to view data in a specific category, the data will not display on the report, even if it fits the query criteria.
B. Notes - users may be restricted from viewing notes on reports.
-
Notes may be restricted if the note types were set up to belong to security groups. See Note Types.
-
The system administrator must set up each user's security access for the Record.Notes option.
-
When running reports that display notes, if the user does not have the permissions to view specific note types, they will not display on the report, even if they fit the query criteria.
C. Student Tracking - users may be restricted from viewing student tracking information on the reports.
-
Student Tracking Types may be assigned to security groups in Tools > Code Setup > School > Student > Tracking Type.
-
The system administrator must set up each user's security access for the Record.StudentTracking option.
-
When running reports that display student tracking, if the user does not have the permissions to view specific tracking types, they will not display on the report, even if they fit the criteria.


