Gradebook: Entering Marks
To enter marks for assignments (including homeworks, quizzes, tests, etc.) in the Gradebook module:
-
Set the filters on the Grades tab to display the correct marking period and assignment categories.
-
Find the column for the assignment to mark.
-
Enter the mark for the student for the assignment.
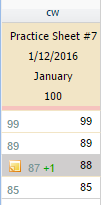
The mark entered will display on the left of the column. The number on the right will reflect the mark % based on the maximum number of points for the assignment. For example, if the maximum number of points is 4, a mark of 4 would display as 100.
A character grade may be entered if it was set up under Gradebook Setup: Mark Values.
A check mark may be entered by using the ` key.

Full Edit - If the option
of Full Edit is selected on the
header of the Grades tab, entering
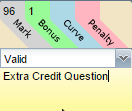
a mark will open up additional options to input:
-
Mark - enter the mark.
Leaving the mark blank will ignore it for the student and will not include it in the average. -
Bonus - enter the bonus points earned. The mark will display as the mark entered plus the bonus points on the left and the total number of points on the right.

-
Curve - enter the extra curve points earned. The mark will display as the mark entered plus the curve points on the left and the total number of points on the right, similar to the bonus points above. A curve can be entered for an entire section.
-
Penalty- enter the number of points to deduct. (Enter a positive number, not negative). The mark will display as the mark entered minus the bonus points on the left and the total number of points on the right.

-
Mark Status - a status may be selected from the dropdown. The status selected may affect how the mark will be cacluated in the average. See Grade Status on the Setup tab.
-
Note - enter an optional note or description for the bonus or penalty points. A yellow note icon will display in the mark field if a note was entered.
 .
Only the teacher will see the note icon; it will not be visible to
the parents or students.
4.
A message  will
display on top of the page.
Click
Save  on to Grades toolbar to save the marks.
5. If your system is set up to allow parents and students to view the marks on their portal, see Displaying Marks on the Parent Portal.


