
 
|

|
Using the Scheduler
The Scheduler is used to create the class schedules, assigning each section to the day and period it will meet.
 |
NOTE: You can save different versions of the schedules with the Scheduler. Publish the schedule when the final version is completed and ready to be released. The schedule does not take effect until it is published. |
The following prerequisites are needed:
-
The Scheduler application must be installed. Please contact your 360° Account Manager if you do not have access.
-
Classes and Sections exist for the current term. See setting up Class Codes and setting up Sections.
-
Term Quarters were set up for the selected term and division(s).
-
The Rotation Schedule was created for the selected term. See Create Rotation Schedule.
-
Grades should have a sort order set up in Tools > Code Setup > School > Academics > Grades.
1. Open the Scheduler
application. The Scheduler is a separate application from the 360° windows
application. ![]()
2. Select the term and division(s).

3. Click ok. The scheduler may take a few moments to load.
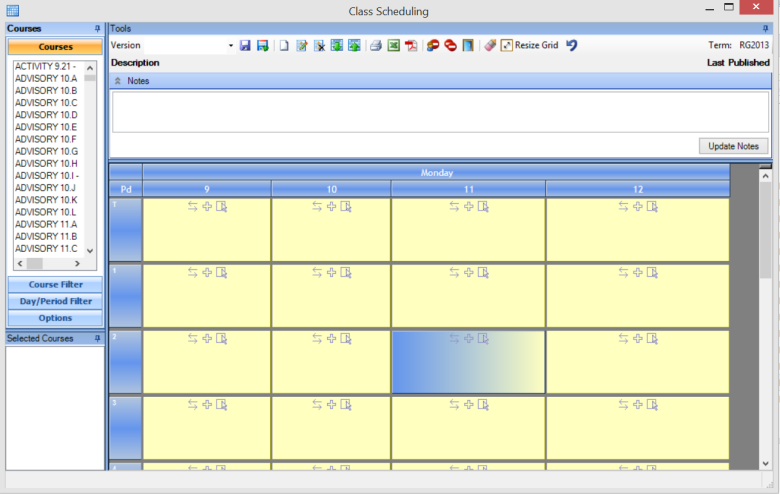
4. Versions - Before starting to work on the schedule, a version must be assigned. Either select the version from the dropdown if continuing to work on a previous schedule, or save the version to create a new one. Click save and enter a version name (ie. HS 1).

|
Note: There cannot be more than one user working on the version at the same time.
|
An existing schedule from another division
can be imported by clicking on the download icon on the toolbar.
5. Filters and Options - The following filters and options are available to help you isolate the courses and periods you want to schedule. (click on an option below to expand and view more details):
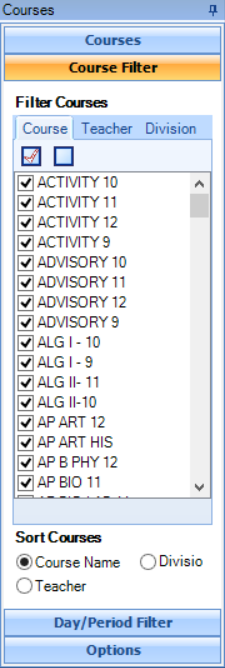
- Course Filter - use the filter to show just the courses you are scheduling. Filtering the courses will affect the list of courses that will display in the Courses panel.
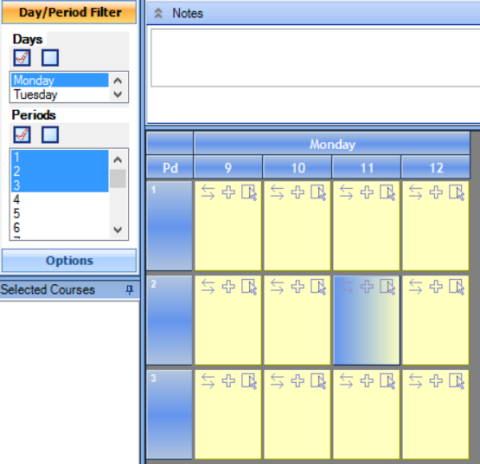
- Day/Period Filter - use the filter to select the rotation days and/or periods to display in which to schedule the courses.
- Options - select display options such as teacher name display and holding periods.
 icons
in each period. If not selected, the text
icons
in each period. If not selected, the text  will display.
6. Scheduling the Classes - To schedule a course for a specific period:
-
Drag courses from the Courses panel into the period box in the scheduler.
-
Or, select the course in the Courses panel by single-clicking on it, and then select
 in each
period.
in each
period.
7. Swapping Courses - To switch classes from one period to another:
-
In the period of classes to move, select one or more classes (or click select all).
-
Click the swap icon
 .
. -
If there are classes in the second period that you want to swap with the first period selected, press your ALT key and select one or more classes to swap (or click select all).
-
Click the swap icon
in the second period.
8. Copy Courses - To copy courses from one period to another:
-
In the first period from which to copy, select one or more periods
-
In the second period, click add
.
9. Setting Teacher Constraints - To set up the periods that each teacher cannot be scheduled (ie. is not available to teach):
-
Select the teacher constraint icon
 from
the toolbar.
from
the toolbar. -
From the Teachers panel, drag the teachers into the periods that they are unavailable to be scheduled.
-
Click save.
-
Close or minimize the teacher constraint window to return to the scheduler.
-
When scheduling courses, the course will display in red if it violates a constraint.
-
To copy teacher constraints from year to the next, select the
 icon
from the toolbar.
icon
from the toolbar.
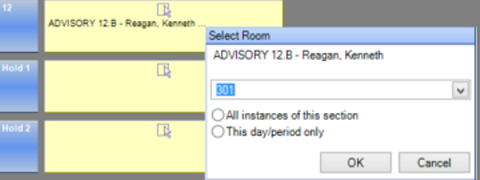
10. Room Assignments - To assign room numbers to a scheduled course:
-
Select the room assignment icon
 from
the toolbar.
from
the toolbar. -
Click on the ... next to the course name
-
Select a room number from the dropdown.
-
Choose whether to apply the selected room number to all scheduled periods of this section, or just to the selected day & period.
-
Click OK.
-
Save the room assignments when done with assigning all of the rooms by clicking the save icon
 on the toolbar of the room assignment
window.
on the toolbar of the room assignment
window. -
On the Scheduler screen, the room numbers will now display next to the sections.
11. Save the
schedule to the selected version .
12. Publish the Schedule - When the schedule is complete and ready to be released, it must be published:
-
Save the version.
-
Click the publish icon
 on the toolbar to publish the current
version.
on the toolbar to publish the current
version. -
The Last Published date on the top right will display the updated published date.
 |
CAUTION: Save the schedule before closing the scheduler. It may not prompt you to save the latest changes.
|