Report Schedule Job Options
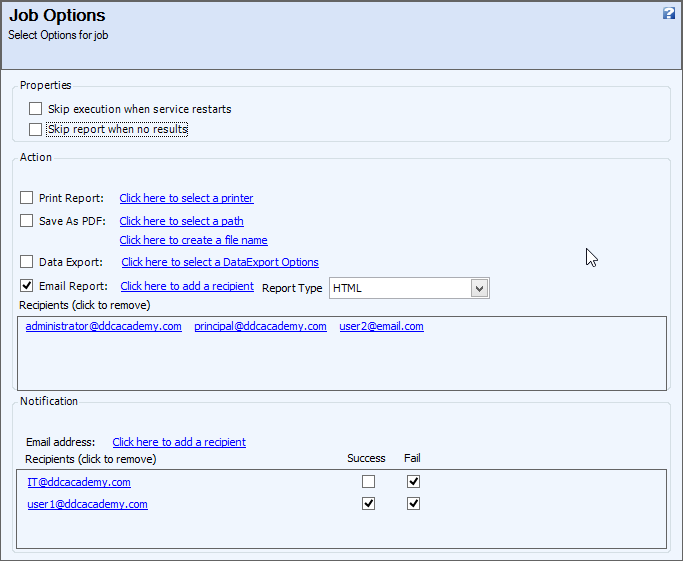
When scheduling a report to run, select the actions the report will execute.
The Job Options page is part of the Job Schedule wizard.

I. Properties - optional settings for the scheduled report are:
- Skip execution when service restarts - if the query builder service did not send out the report and is then restarted, do not execute the report, even if it should have been run during that time period.
- Skip report when no results - if the report has no results, do not commit the actions below. This is applicable to regular reports and not mass emails.
II. Action - select the output type of the report:
- Print Report - the report will print out of the selected printer. Click on Click here to select a printer to choose the printer that will be used each time.
- Save as PDF - the report will be saved as a PDF file.
- Click on Click here to select a path to choose the location of where the file will be saved on your computer or network. A new folder may be created.
- Click on Click here to create a file name to enter the name of the file that will be saved. Use the dropdown to use merge fields to create a unique file name each time it is run. Select a merge field and click Add. Ex: <<Report Name>> <<Date and Time>>.
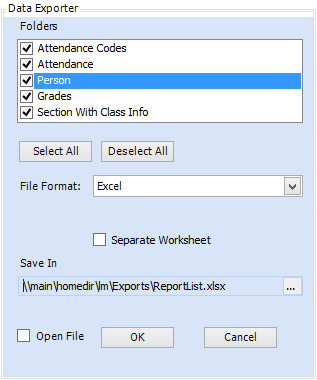
- Data Export - the report data will be exported into a file. Click on Click here to select a DataExport Option to select the format that the data will be exported as (ex: Excel), as well as the path and file name that will be saved.
- Email Report - the report will be emailed to the selected recipients.
- Click on the Click here to add a recipient link to enter the emails that will receive the report. Enter the recipient's email address and click Add Email. Multiple email addresses may be added. For convenience, the email addresses of 360° users will display in a list and can be checked off instead of typing them in.
- Click on the Report Type dropdown to select the format of the report that will be emailed: HTML or PDF.
- The email addresses entered will display in the Recipient section.
- To remove the recipient, double-click on the email address.


|
|
NOTE: When scheduling a Mass Email report, the Action section is not needed as the recipient list is already identified in the Mass Email report itself. |
III. Notification - enter the email addresses of recipients (or select users' emails from the list) to receive an email notification when the report is sent out, or fails to send.


