Select Columns
Add, Remove, or Arrange column orders on a grid
To arrange the order of columns in a grid, or to add or remove columns, select View from the grid's toolbar and select Select Columns from the menu.
- Drag column names from the
list directly onto the grid to arrange the order and to add additional
columns to the grid. The column should be dragged directly on the
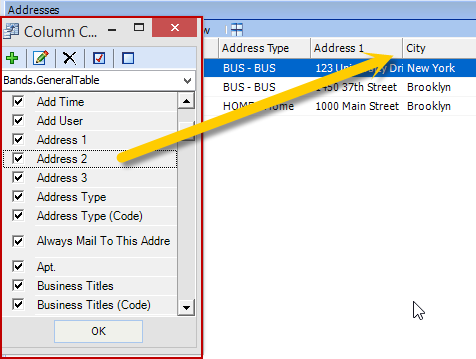
grid column heading. In the example below, to display address 2 next
to address 1, drag the Address
2 from the list on the left and drop it between the Address 1 and City column headers.
The column header will remain on the list even after being added to the grid, but the column will never display on the grid more than once. Dragging it to a position on the grid will move it from its previous position.

- To add columns, without selecting the
position in the grid, check off the column name on the list. To display
all columns in the grid, select the
 all
button on the top of the Select
Columns.
 - To remove columns from the grid, uncheck the column from the list.
- Columns can be sorted directly on the grid by dragging the column on the grid to another position. Note that the Select Columns list must be closed.
- Columns can be removed from the grid by dragging the column heading off the grid. Note that the Select Columns list must be closed.
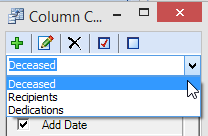
Note: Some grids display expandable rows (such as the addresses and tributes) with multiple sub-rows. When selecting the list of columns to choose for the grid, use the dropdown on the top of the Select Columns. In the example below on the Tributes panel, select the list of columns for the Deceased, Recipients, or Dedications rows.

 |
NOTE:
To save the grid changes, the grid layout must be saved. If the grid layout is not saved, the column adjustments will be in effect only while the form stays opened. |


