Exporting Payments to Quickbooks
If using Quickbooks, the payments that are entered in 360° may be summarized and exported in order to import and update Quickbooks. This streamlines your data entry and ensures that all payments entered in the 360° will be reflected in your Quickbooks account.
The data will be exported into a file with the extension of .iif.
|
|
NOTE:
|
I. Pre-requisites - the following data must be set up in 360°:
A. Bank AP Account - for each 360° deposit account, enter the Quickbooks AP account number.
1. Open Tools > Code Setup > Financials > Deposit Accounts - Info tab.
2.
For each deposit account, enter the AP Account
that will be credited in Quickbooks. It must be spelled exactly as it
is set up in Quickooks or a new AP account will be created in Quickbooks
if it doesn't match during the import. In the example below, all
payments entered under 360°'s Chase account will be filed in Quickbooks
to 1002.

B. Revenue G/L Account - for each 360° campaign code, enter the Quickbooks Revenue GL account.
1. Open Tools > Code Setup > Financials > Campaigns > Campaign Codes - General Ledger tab.
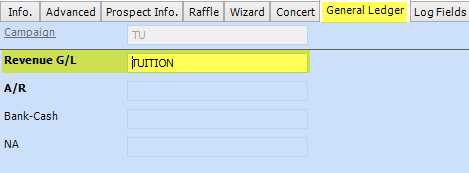
2. In the Revenue G/L (general ledger) field for each campaign code, enter the Quickbooks income account that corresponds to the campaign. It must be spelled exactly as it is set up in Quickbooks, whether it is numeric (ex: 31030) or alphabetical (ex: Tuition). In the example below, payments towards campaign TU will be applied to the Quickbooks income account TUITION.

3. If Quickbooks is set up with different income accounts per year, go to Tools > Code Setup, Financials > Campaigns > Campaign IDs - General Ledger tab. Enter the the Revenue G/L only for the campaign ids that have varying accounts per year in Quickbooks. If there is no revenue g/l for a campaign id, it will use the one on the campaign code, as entered above.
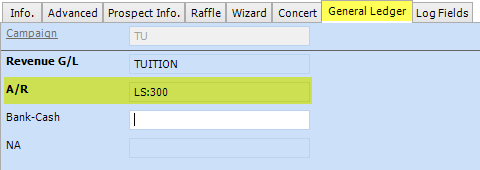
4. If Quickbooks is set up to use classes, enter the Quickbooks class name in the A/R field of either the campaign code or campaign id, as described above. If using subclasses, enter the class:subclass in the A/R field. The class and subclass name must be spelled exactly as they are set up in Quickbooks. If classes and subclasses are not being used, leave the A/R field empty.
In the example below, the 360° payments for campaign TU will be imported into Quickbooks to income TUITON, with the class of LS and subclass 300.

II. Data Entries in 360°
A. When adding a payment, the deposit account and campaign selected will determine the AP and Income accounts in Quickbooks, as set up above.
B. It is recommended that only deposited payments be exported from 360° to import into Quickbooks. Headchecks should not be posted to Quickbooks until they are deposited. Use the Make Deposit Utility to deposit the payments.
C. All financial transactions are recorded on the Ledger panel in the Financials module. The data from the deposited payment records on the Ledger panel will be exported to post to Quickbooks. Additionally, when the transaction will be exported to be posted to Quckbooks, the date will be updated in the Ledger's Date Posted field to ensure the same transaction doesn't get posted again.
The screenshot below depicts a transaction on an account's Ledger panel. It shows a payment that was dated and deposited on 2/6/2015 to the campaign of TUI2014 for the amount of $100 to the deposit account of ADJ. As the Date Posted is blank, it has not yet been exported to post to Quickbooks.

III. Running the Export to Quickbooks - The data is exported through a report in the Query Builder under Financials > Payments > Export to Quickbooks.
1. Select Preview to run the report.
2. Filter the criteria.
A. To include only payment transactions that have been deposited (recommended), the criteria should filter the Ledger for Date Deposited is set.
B. To include only payment transactions that were not yet posted, the criteria should filter the Ledger for Date Posted not set.
C. To export payments in a specific date range, filter the Deposit Date.
In the example below, payment ledger transactions that were not yet posted to Quickbooks and were deposited on or after 1/1/2015 will be included.

3. Select Done to run.
4. A page will open with a link to click to save the file. Click on the link.

5. As prompted, save the file. It will have the extension .iif. Remember what the file is named as it will be needed to import to Quickbooks.
6. Close the Query Builder preview page with the link. A prompt window will display asking whether to update the Date Posted of the exported transactions.

IMPORTANT: Select No if the file that was saved was not yet reviewed. See below on reviewing the file. Once the data exported is confirmed as being correct, re-run the query as described in steps 1 - 6 above and then select Yes. This will then update the Ledger Date Posted for all of the transactions that were included.
IV. The Exported File - review the exported file before importing into Quickbooks to ensure it includes the correct data. The file may be opened in Notepad. If the data looks correct, run the query again and answer YES to update the Date Posted.
The transactions are grouped by Deposit Account, Deposit Date, and Campaign.
Below is a sample file. It is formatted specifically for Quickbooks' Import an IIF file utility. :

(1) Each file starts with these 3 lines. They are essential to the import.
(2) Each group of transactions will begin with "TRNS". A group of transactions is a summary of all the transactions with the same deposit account and deposit date. While the first two fields are internal, the third shows the deposit date, the fourth the deposit account's AP account (that was set up in the pre-requisites above), and the 7th field reflects the sum total of the payment amounts for the deposit account and date.
(3) Each line in the detailed transactions begins with "SPL" and contains the total payment amount per campaign. The third field reflects the deposit date, the fourth displays the campaign's Revenue G/L (set up in the pre-requisites above), the sixth field displays the A/R if applicable (as set up per campaign A/R in the pre-requisites to reflect the Quickbooks class), and the 7th field displays the total payment amount per campaign, deposit account, and deposit date.
(4) After each group of transactions, an "ENDTRNS" line will print.
V. Importing to Quickbooks
A. Before importing the file to Quickbooks for the first time, we strongly advise making a copy of your Quickbooks data. If the data was not set up properly and did not import as expected, restore your copy.
B. Before importing the file, make sure you have a valid backup of your Quickbooks data.
C. In Quickbooks, select File > Import IIF File and select the file that was exported from 360° above.


