Merging Account
The Merge Accounts feature combines the data from two accounts to one. Data on both accounts including all addresses, associations, financials, etc. will carry over to the merged account.
This feature is most often used when there are duplicate accounts in the system, or in situations where two individual accounts marry and want to form one account.
Note: If any of the account members on the merged account are registered users on the web portal, look up their user login on the portal Logins page before merging. After merging the accounts, you may need to update the portal Username with the new account member id. See Updating a Person ID on a Web Account.
1. Accounts can be merged by either of these methods:
-
On the system toolbar:
-
Click on the dropdown next to the search icon.
-
select Account Merge

-
Search for the accounts.
-
On the search results grid, click on the first account to highlight it.
-
Ctrl+Click on the second account to highlight it.
-
Select the Account Merge icon on the toolbar.

-
On the Account Header:
-
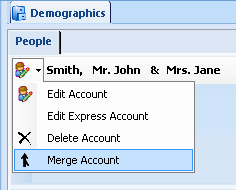
Click on the Account icon dropdown arrow on the top left of the account name and select Merge Account.

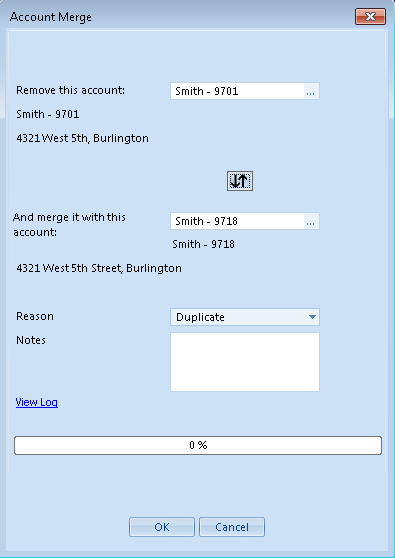
2. The Account Merge screen will open with the selected account(s).

3. The first account will be removed and merged with the second account.
To select another account, click on the  to search.
To switch the accounts and remove the second
one to merge with the first, click on the  icon to reverse the order of accounts. The account number will be that
of the second account. Generally, the account with more information, such
as the one that has students, contracts, or financial information, should
be kept.
 |
NOTE:
Accounts cannot be merged if they each have a Tuition Contract for the same term. Since the resulting account can only have one contract per term, one account's contract will need to be deleted first. |
4. Select the reason for the account merge and enter any optional notes.
Select OK to start the Merge Wizard.
5. The Resolve Conflicts screen will display to confirm the data that will be merged.
If the two accounts have conflicting master flags, select either First Select or Second Select to choose which value will save on the merged account.

6. Reconcile Account Members screen - select the people that will be merged. For each person on the account that is being deleted, select to either merge him with a person on the second account or create him as a new person on the account.
In the column Merge With, select a person's name from the second account to merge the two people together, or select New to create a new person with that name on the account.

Once all people have been selected, click OK.
7. Review Account Members screen - confirms all the people on the merged account along with the account member types. Adjust the types as needed. There can be only one Primary person and one Spouse on the account.

Once all the types have been confirmed, select OK.
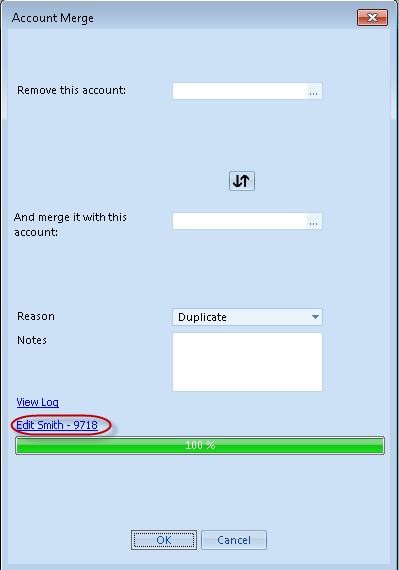
8. The accounts will now merge together. The Account Merge screen will show 100% complete.

9. The merged account can now be edited to make any additional adjustments by clicking on the Edit link. There may be duplicated addresses and/or phones that will need to be adjusted.
10. A history of all merged accounts can be accessed by clicking on the View Log link.
11. Select Cancel to close out of the Account Merge.
 |
TIP:
Verify that the first account was deleted by trying to search for the account in 360°. |


