Using the Wizards
Most data entry screens in 360° are set up as a wizard and include the common features detailed below. Adding or editing accounts, addresses, pledges, payments, students, etc. all use wizards.
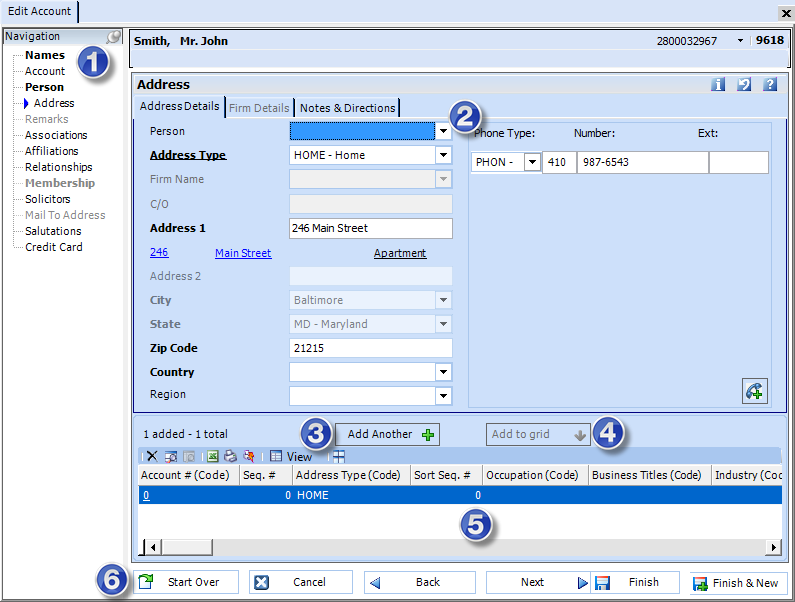
The following screenshot shows the Edit Account wizard.

(1) Wizard Pages - all the pages in the wizard are listed in the navigation side-panel.
- Pages listed in bold indicate data has been entered.
- Pages listed in red indicate missing required fields.
- Pages listed in gray indicate the page is a marked as a skip page and using the Next and Back navigation buttons (detailed below in (6) ) will not navigate to the page. Click on the disabled page from the navigation list to load it. See Wizard: Skip Pages for marking and un-marking skip pages.
- The Navigation panel may be collapsed to allow for more room on the screen. It may also be collapsed by default if the wizard contains only one page, for example in the case of the Edit Address wizard below. Click on it to display the page(s), and click on the pin icon to keep it expanded or unpin to collapse.

(2) Data
Entry Fields- each page of the wizard will load in the window.
Pages with data entry fields usually follow the protocol below:
- Tab Key
- use the tab on the keyboard to move to the next field
to facilitate data entry without using the mouse.
- Skip
Fields - fields in gray will be skipped over when using
the tab key. Fields may be marked to be skipped to facilitate data
entry if a user does not typically enter data in the field. See Wizard:
Skip Fields for marking and un-marking skip fields. To enter data
in a field that is marked to be skipped, manually click in the field
with the mouse.
- Required
Fields - fields that are required will be underlined
in the data entry screen.

- If data was not entered in the required
field, the field name will display in red and the data will not
save until it is populated.

- If no data is being added, the required field on a page should be left blank. For example, if a new person is not being added, do not select a Person Type.
(3) Add Another - on wizard pages where multiple entries may be added (ex: people, addresses, associations, student immunizations, etc.), click Add Another to add an additional entry.
- Add Another may be disabled until the entry was saved (see Add to Grid below).
- Make sure the previous entry was added to the grid of entries before clicking Add Another to avoid losing the data entered.
(4) Add to Grid - on wizard pages where multiple entries may be added (ex: people, addresses, associations, student immunizations, etc.), a grid will display at the bottom of data entry page (see (5) below). Click Add to Grid to save the entry by adding it to the grid of information. If Add to Grid is not selected, the data may not be saved.
- On some data entry pages, the data being added may automatically be added to the grid when all the required information has been entered. In those scenarios, the Add to Grid button will be disabled as soon as the information has been added and the Add Another will be enabled to add the next set of data if needed.
(5) Grid - wizard pages where multiple entries may be added (ex: people, addresses, associations, student immunizations, etc.) will contain a grid displaying the data already entered previously, along with the data being added in the wizard.
-
Entries being added in the current wizard may be removed from the grid by right-clicking on the row and selecting Delete.
-
Grid features found on grids throughout the system are applicable to the grids in the wizard pages as well.
(6) Wizard Navigation
- use the following buttons to navigate through the wizard.
-
Start Over - clear the data that has been entered in the wizard. If it is a multi-page wizard, all data entered in all pages will be cleared out.
-
Back - available on wizards with more than one page, click to navigate to the previous wizard page (that is not marked as skipped page).
-
Next - available on wizards with more than one page, click to navigate to the next page in the wizard (that is not marked as a skipped page).
-
Finish - save the data entered in all the pages of the wizard and close the wizard.
-
Finish & New - save the data entered in all the pages of the wizard and keep the wizard open to add additional data.
-
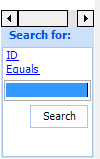
For wizards that are account-specific, the Finish & New will place the cursor in the wizard search box on the bottom of the Navigation side-panel. Search for another account using the wizard search and not the standard system search. To search by different fields, click on the hyperlink (ex: ID or Equals as per below) to select another search option.

|
|
Tip: The keyboard shortcut CTRL + S may be used to save and close the wizard and acts as the Finish button. The keyboard shortcut CTRL + I may be used as Finish & New. .
|
·


