Receipt Templates
Receipts are different from other 360° reports as the layouts are mail merge documents as opposed to the standard query builder report layouts. Users create their own receipt template and insert the 360° merge fields, giving the users greater control and flexibility on the layout.
The receipts are set up and printed via a report in the Query Builder.
To set up the receipt template:
1. Select the report in the Query Builder in Public > Financials > Receipts > Receipts by Campaign.
2. Select Edit > Edit Template Options

3. On the options page, the Selection Mode should be marked as Multi-Template. Multiple receipt templates may be linked to the report. The system will determine the layout to use based on the payment's receipt type.
In the Select Template Field section, select Receipt Code [Receipts].
Click Next.

4. The template page is used to link the receipt template to the payment receipt type.

-
Field Name - select the receipt type. There must be a record for Default which will be used for any payments with a receipt type that are not specifically itemized on this page.
-
Template name - select the receipt template.
-
Click on the
 button
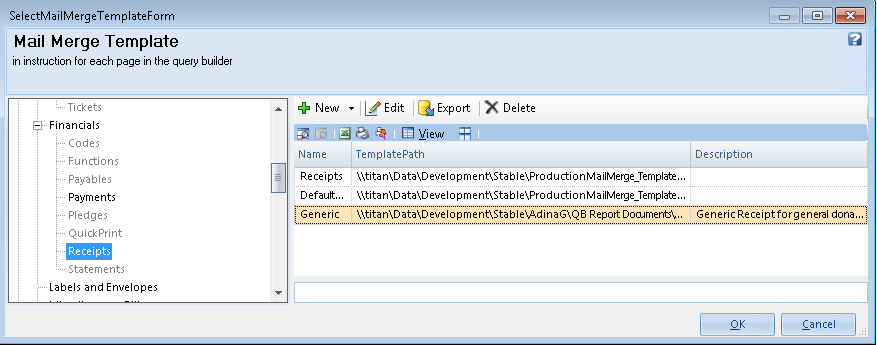
to the right of the field. The Select Mail Merge Template window
will display.

-
A template can be generated from an existing MS Word document of a receipt, or a new template can be created.
-
Create a new template:
-
Select New > New Document Template.

-
MS Word will open a new document.
-
Enter the letter text and format it accordingly.
-
Use an existing Word document for the 360° receipt mal merge template:
-
Select New > Existing Document Template.
-
Select the document to use.
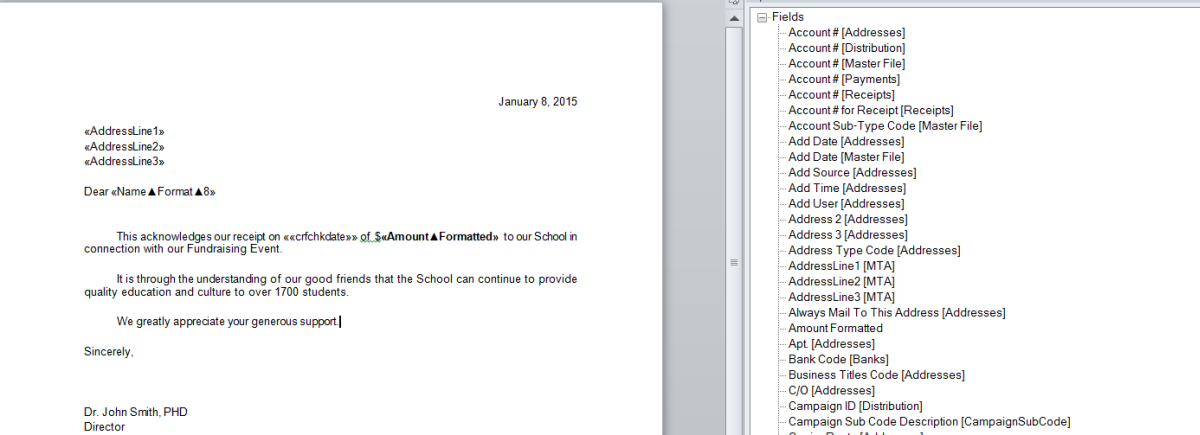
III. MS Word will display a list of the available merge fields on the Report Fields window on the right.
Double-click
on the merge field to insert it within the word document text. The merge
field will be inserted where the mouse cursor is.
 |
TIPS:
1) If the Merge fields do not display, your computer may need a Word Add-in. Please contact DDC technical support for assistance. 2) The receipt template can be opened directly in MIcrosoft Word and the merge fields copied from another receipt template that has already been set up. |
IV. Save the document. The document should be saved to a directory located on the server that all users that may need to use the receipts can access. The document should not be saved to your local C drive. A recommended location to save all receipt templates is your server's DDC\360 Solutions\QB Report Documents\Receipts directory.
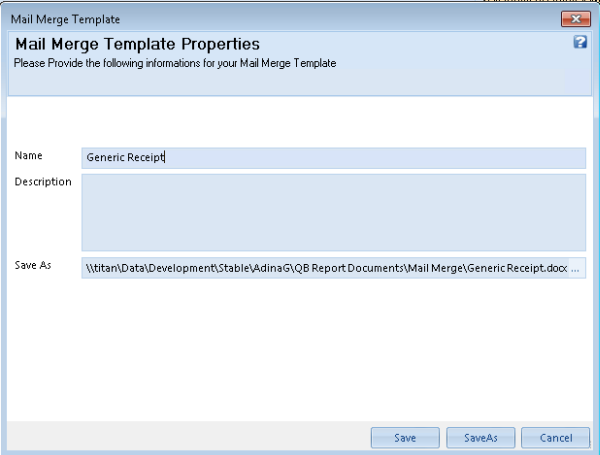
V .In the Mail Merge Template Properties window, enter a Name for the template. Select Save.

VI. In the Select a Folder window, select the location to save the receipt in the query builder. The recommend location is under Public > Financials > Receipts
Click
OK.

VII. The
new template will be added now to the Mail Merge Template grid. Repeat
steps II through V above until all templates are configured.
Click OK when complete.

5. On the Multiple Mail Merge Mapping page, repeat step 4 above for each receipt type. Each receipt type should be linked to a receipt template. When the receipt report is run, it will print the template based on the receipt type selected for each payment.

6. Click Apply on the Multiple Mail Merge Mapping page to save the setup.
The Apply button will be disabled if there is no receipt template linked to Default. Confirm there is a default receipt mapping.
7. Click Save.
The report templates are now set up.


