Publishing
1. Before publishing, follow the instructions for previewing the report card in the topic “Printing.” Generate the report and confirm the content.
2. Click on the drop-down arrow next to Preview ( ), which will prompt the following menu:

3. Click “Generate Doc.”
4. Check the criteria (which should be the same criteria you used when printing the report card).
5. Click the button to
continue and go on to the “Document Generation Settings” window.
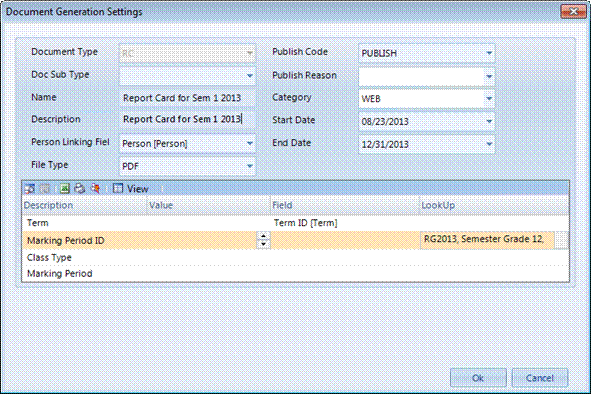
6. At the top of the “Document Generation Settings” window, complete the following fields:
a. Name - The name is what the generated document will be called internally (i.e. RC Sem 1 2013).
b. Description - The description is the name the parent and teachers will see on the portal (i.e. Report Card Semester Grade 1 - 2013)
c. Person Linking Field - Ensure that this is set to "Person [Person]".
d. File Type - Ensure that this is set to "PDF".
e. Publish Code - Under Publish Code, select from one of the following options:
i. Publish: Selecting “Publish” will allow parents to see the report card immediately.
ii. Review: Generates the document, but parents won’t see it on the portal.
Use this if you don’t want parents to have access to the report card from the parent portal, but you do want teachers to be able to access the report card from the staff portal.
iii. Hold: Generates the document to the parent portal, but parents will not be able to open the document.
Use this if you want parents to know that their child's report card was published, but the parent can’t open it for a specific reason. (i.e. outstanding fees)
NOTE: You can use the “File Store” feature to change the publish code on generated documents. Please refer to the “File Store” topic in this guide.
If there are some files that need to be published with a code of Publish and others need to be published with a code of Hold do one of the following:
-
Generate all documents with a code of review; this will generate all documents but they will not appear on the parent portal yet.
You can then navigate to the file store and select the files that need to be on hold and put them on hold. You will then easily be able to publish the rest. -
Generate all files with a code of Publish. Navigate to the file store and select the files that need to be put on hold.
Use this method if you are generating the documents with a start date that is later than today; this way even if you publish the ones that are supposed to be on hold, parents won't see it.
f. Publish Reason: Optional.
If you put documents on hold, select a reason for why the document is on hold from this dropdown. This reason will be displayed on the parent portal for parents to see.
Publish Reasons can be set up in Codes Setup > School > Web Advanced > Publishing > Publish Reasons.
g. Start Date - Select a Start Date for the report card to become available on the web.
h. End Date: Select an End Date if you do not want the report card to appear after a certain date.
7. Complete the parameters grid at the bottom of the window, which controls how your file will be classified. Assign a Field value if a separate document needs to be generated for each value of that field; and a Lookup value if there are multiple parameters.

a. Term: Since you print for one term at a time, we recommend using the field column with the value “Term ID [Term].” Otherwise, you will be required to change it next year. This setting will automatically classify the report card as RG2012, RG2013, etc. You do not have to specify the term in the Lookup column because the Field column will find the correct term.
b. Marking Period ID: Choose from the lookup the term, marking period and division that you are running for. Schools often print multiple marking periods on the same report card, so indicate the current marking period here. WARNING: Indicating this value under Field will give you a separate report card for each marking period.
c. Class Type: If you are running report cards by class type, then choose “Type [Class Codes],” otherwise leave blank. If you have a separate report card for each curriculum type, then you will need to identify your parameters in the Lookup column. If there is one report card for all curriculum types, you are not required to input a class type.
d. Marking Period: Not used.
8. When finished, click the  button.
9. You will be prompted to publish the report card to the parent portal.


 [
[